How to Choose the Right Embroidery Hoop Size for Different Fabrics
Have you ever struggled with fabric puckering or uneven stitches during your embroidery projects? One of the most common challenges embroiderers face is selecting the right embroidery hoop size. Choosing an inappropriate size can lead to frustration and subpar results. The good news is that understanding which hoop to use depends on several key factors, including the type of fabric, the design size, and the hoop’s technology. For instance, thinner hoops work better on delicate fabrics, while larger hoops offer more stability for bulky materials. Whether you’re a beginner or an experienced embroiderer, mastering the art of selecting the perfect hoop size can dramatically enhance your stitching quality and confidence. In this guide, we’ll explore essential tips to help you choose the right hoop for any fabric, ensuring a smooth, professional finish every time. Want to unlock the secrets to flawless embroidery? Keep reading to discover how to match the right hoop to your fabric type and project needs, and take your embroidery skills to the next level.
What Research Reveals About Hoop Sizes and Fabric Types
Choosing the right embroidery hoop size is essential for achieving professional results and minimizing issues such as fabric distortion or puckering. Recent studies and industry reports highlight key insights into fabric compatibility, optimal hoop selection, and emerging trends. Understanding these findings can significantly enhance your embroidery projects’ quality and efficiency.
Fabric Compatibility and Hoop Selection
Research indicates that approximately 65% of embroiderers prefer hoops that match the fabric weight, with 45% reporting puckering problems when mismatched. Lightweight fabrics, such as chiffon or silk, typically require smaller hoops, around 4 to 5 inches, to prevent overstretching and puckering. Medium fabrics like cotton or linen perform well in 6-inch hoops, offering stability without excessive tension. Heavy fabrics, including denim or canvas, often demand larger hoops—8 inches or more—to distribute pressure evenly and avoid fabric damage.
Key insights emphasize selecting hoops that are 1-2 inches larger than the design edges, providing sufficient fabric margin for stabilization. Modern trends, such as textured embroidery or metallic threads, necessitate larger hoops (6-8 inch) to maintain fabric tension and accommodate intricate or bulky designs. Using incorrect hoop sizes frequently leads to rework, wasted time, and compromised stitch quality.
Design Complexity and Trend Impact
Recent data show that 70% of artisans experimenting with textured threads prefer larger hoops, primarily 6 to 8 inches, for better stability and control. Complex designs with dense stitching or metallic threads benefit from increased tension control provided by larger hoops, reducing thread breakage and stitch distortion. Small hoops are suitable for delicate, simple motifs, but larger sizes are recommended for larger, intricate projects to ensure even tension distribution and reduce puckering issues.
Overall, selecting the correct hoop size tailored to fabric type and project complexity not only improves embroidery quality but also minimizes rework, saving valuable time and materials. As industry trends evolve, staying informed through empirical research ensures optimal hoop choice for every fabric and design.
Step-by-Step Guide to Selecting the Perfect Hoop for Your Fabric

Choosing the right embroidery hoop size is essential for achieving professional-looking results and ensuring your fabric remains taut and smooth throughout your project. The process involves assessing fabric type, design size, and understanding the features of various hoops for optimal stability and ease of use. Follow this structured guide to confidently select the perfect hoop for your next embroidery project.
Assess Fabric Weight and Stability
Begin by evaluating the weight and stability of your fabric. Lightweight fabrics such as chiffon or silk tend to be more delicate and require smaller hoops, typically 4 to 5 inches, to prevent excessive tension that could cause puckering. Heavy fabrics like denim or canvas need larger hoops, ranging from 6 to 8 inches, providing ample support without stressing the material. Testing the fabric’s tension by gently pressing and smoothing it before hooping can help you determine its pliability and the appropriate hoop size.
Match Design Size with Hoop Diameter
Ensure your embroidery design fits comfortably within the chosen hoop without overstretching the fabric. Measure your design’s maximum dimensions using a ruler or digital software, then select a hoop that offers at least 1 inch of space around the design for proper tension and manipulation. For example, if your design measures 3 inches wide, selecting a 5-inch hoop provides enough room for adjustments and stable stitching.
Test Fabric Tension Before Hoopting
Before securing your fabric, test the tension by placing a scrap piece of similar fabric in a potential hoop. Adjust the tension sliders or mechanisms to achieve a firm but not overstretched fabric. If puckering or slack appears, adjust accordingly. Modern hoops with features like built-in adjustable tension and anti-slip rings enhance fabric stability and make this step quicker and more reliable.
Use Measuring Tools for Accurate Selection
Utilize rulers, measuring tapes, or embroidery software to precisely measure your fabric’s width and the placement area for your design. This ensures you select a hoop size that maximizes fabric coverage and design placement without causing unnecessary tension. Popular brands such as Brother, Janome, and Bernina offer a variety of hoop sizes and styles to match different machine models and project needs.
Experiment with Different Hoop Types and Features
Consider different hoop types based on your fabric and project complexity. Magnetic hoops are excellent for quick adjustments and delicate fabrics, while spring hoops provide robust support for heavy or textured materials. Additionally, search for hoops with modern features like adjustable tension, anti-slip rings, and magnetic locking for enhanced fabric stability and ease of use. Testing with scrap fabric before starting your project helps fine-tune the tension and confirms the right size and type of hoop for your fabric.
Tools and Equipment for Optimal Hoop Selection and Embroidery Results
Choosing the right embroidery tools and equipment is essential for achieving professional and clean embroidery results, especially when working with different fabric types. The proper hoops, machines, and accessories can streamline your workflow, improve fabric stability, and significantly reduce frustration caused by slipping or puckering. This section highlights popular hoop options, machine features, and compatible accessories to help you customize your setup based on project requirements and fabric characteristics.
Recommended Hoop Types and Their Benefits
Among the most popular hoop options are magnetic hoops like the Mega Hoop, spring hoops, and adjustable in-the-hoop (ITH) frames. Magnetic hoops, typically priced between $30 and $70, provide quick and precise hooping, which is vital when working with delicate or stretchy fabrics. They minimize fabric slippage and eliminate the need for clamping, making them highly efficient for repetitive tasks. Spring hoops, costing around $20 to $50, offer a simple mechanism for fabric tension adjustment and are valued for their versatility across various fabric weights. Professional-grade hoops, often exceeding $100, provide extra stability and durability, suitable for large or high-volume projects.
Each hoop type has its respective advantages and limitations, detailed in the comparison chart below, which can guide you in selecting the most appropriate equipment for your fabric handling needs.
Machine Features Enhancing Hoop Effectiveness
Modern embroidery machines such as Janome Digitizer or Brother SE series increasingly incorporate innovative features like built-in stitch cameras, automatic hoop detection, and adjustable clamps. Stitch cameras allow precise alignment and editing, while automatic hoop detection ensures correct hooping before stitching begins. Adjustable clamps maintain consistent tension, essential for fabrics prone to puckering. These features collectively simplify setup, reduce errors, and enhance embroidery accuracy, particularly when using specialized hoops like magnetic or ITH frames.
Compatible Accessories for Better Fabric Handling
To maximize fabric stability during embroidery, consider using accessories such as anti-puckering stabilizers, adjustable tension guides, and fabric grips. Stabilizers are crucial for soft or sheer fabrics, preventing distortion and ensuring sharp designs. Adjustable tension guides help regulate fabric tension uniformly, especially when working with stretchy or textured materials. Fabric grips, including clips or silicone sprays, keep the fabric firmly in place, reducing shifting and puckering. These accessories are cost-effective options that improve overall embroidery quality across various projects.
Comparison Chart of Embroidery Hoop Types
Practical Tips for Preventing Marking and Puckering During Embroidery
Achieving smooth, professional-looking embroidery depends heavily on proper hooping techniques and fabric handling. Common issues like fabric marking and puckering can be minimized with the right tools and methods, ensuring consistently flawless results. This guide provides actionable tips to enhance your embroidery process and avoid these common pitfalls.
Use Stabilizers to Reduce Marking
One of the most effective ways to prevent hoop marks is by using wash-away or dissolvable stabilizers, especially on delicate fabrics. Stabilizers provide a supportive base that limits fabric distortion and reduces pressure points. When hoop marks are a concern, applying these stabilizers helps distribute tension evenly and ensures the fabric remains smooth. In fact, 70% of users report fewer puckering issues when incorporating stabilizers and magnetic hoops with adjustable tension into their workflow.
Select the Appropriate Hoop Size
Choosing the correct hoop size for your design and fabric type is crucial. A hoop that’s too small can cause excessive tension and distortion, while one that’s too large may result in slack fabric. Match the hoop to your design dimensions and fabric weight for optimal tension. For instance, lightweight fabrics like silk benefit from smaller hoops with gentle tension, whereas heavier materials like denim require larger hoops to prevent overstretching and puckering.
Follow Proper Hooping Technique
Ensure your fabric is smooth and free of wrinkles before hooping. Gently pull the fabric taut without overstretching it, then evenly tighten the hoop to avoid uneven tension. Securing fabric edges with additional stabilizers or clips helps maintain fabric integrity during embroidery. Consistent, even tightening minimizes puckering and produces cleaner stitches. Test tension on scrap fabric to refine your machine settings before working on the final piece.
Use Marking Tools for Accurate Design Placement
Implementing water-soluble fabric pens or other marking tools allows precise placement of designs without harming the fabric. Marking guides help you align your embroidery pattern correctly, reducing the need for repositioning that can cause tension shifts. This step significantly contributes to avoiding puckering and ensuring professional results.
Cost-Effective Strategies for Hoop Selection and Embroidery Efficiency

Choosing the right embroidery hoop size and type can significantly impact both your budget and productivity. Smart investment in versatile, durable tools not only saves money but also streamlines workflow, allowing for more projects with less rework. By making informed decisions on hoop materials, accessories, and project planning, embroiderers can maximize output while minimizing costs.
Invest in Versatile Hoops and Quality Accessories
Opt for multipurpose hoops such as magnetic or adjustable models, which accommodate different fabric types and sizes. Magnetic hoops, priced around $30 each, offer quick attachment and release, saving valuable time during hooping. Standard spring hoops (~$20) provide reliable tension for various fabrics, while digital stabilizers (~$15 per roll) extend the lifespan of your hoops and reduce reworks by preventing fabric slipping or puckering. Using high-quality stabilizers and accessories ensures longevity and consistent results, ultimately lowering long-term costs.
Maximize Workflow with Smart Planning and Tool Features
Planning projects around a common hoop size minimizes the need for multiple tools and setups. For example, using an adjustable hoop that fits multiple fabric thicknesses reduces the need for different sizes, freeing up space and funds. Additionally, tools with features like quick-release magnetic systems can cut hooping time by up to 50%, boosting overall productivity. Incorporating these features into your workflow means you can complete more projects in less time, increasing profitability and efficiency.
Comparison of Popular Hoop Options
By strategically selecting tools based on project needs, durability, and workflow, embroiderers can achieve significant savings and boost overall productivity. Incorporating versatile, high-quality hoops and accessories tailored to your fabric types is key to efficient and cost-effective embroidery operations.
FAQs: Common Questions About Hoop Sizes, Fabric Types, and Techniques
Choosing the right embroidery hoop size can significantly impact your project’s success, especially when working with different fabric types. Whether you’re a beginner or a seasoned embroiderer, understanding how hoop sizes affect delicate fabrics, puckering, and machine compatibility can help you create beautifully finished projects with ease. Here are some frequently asked questions to guide you through making the best choices.
What hoop size is best for lightweight or stretchy fabrics?
Lightweight and stretchy fabrics benefit from smaller hoops combined with appropriate stabilizers. Smaller hoops help reduce tension on delicate fibers, preventing distortion and puckering. For stretchy fabrics, using a hoop that closely matches the design size ensures better tension and less stretching during embroidery. Experts recommend using hoops in the 4-6 inch range for delicate projects, paired with suitable stabilizers to maintain fabric integrity.
How can I avoid fabric puckering when hooping thin or delicate fabrics?
To prevent puckering, always use the right amount of tension – not too tight or loose. Use a lightweight, tear-away or wash-away stabilizer beneath the fabric to reinforce it. When hooping, place the stabilizer and fabric together, then gently tighten, avoiding over-compression. Flexible hoop systems, especially those with adjustable or magnetic features, help evenly distribute tension and reduce puckering risks.
Are magnetic hoops suitable for all fabric types?
Magnetic hoops are a popular choice for their quick setup and convenience, but they may not be ideal for all fabrics. Heavier fabrics or those with thick layers might not be held securely, leading to shifting. For delicate or lightweight fabrics, magnetic hoops are excellent, but for thick or textured materials, traditional hoops or specialized clamps may provide better stability.
What if my design doesn’t fit the hoop? How to resize or reposition?
If your design exceeds the hoop size, resizing software or flexible hoop systems allow you to adjust design dimensions or reposition the embroidery area. Many modern embroidery machines and software programs enable resizing without distortion, giving you creative freedom. For larger projects, consider using multiple hoopings or stitching sections separately.
How do I choose between spring hoops and magnetic hoops?
Spring hoops provide a more traditional, adjustable tension option suitable for various fabric thicknesses and types, offering more control. Magnetic hoops, on the other hand, offer faster setup and quick adjustments, ideal for quick projects and delicate fabrics. Your choice depends on the fabric type, project complexity, and personal preference. For frequent use with delicate fabrics, magnetic hoops can save time; for heavier or detailed work, spring hoops may offer superior stability.
Can I use different hoop sizes for the same project to achieve different effects?
Absolutely! Using different hoop sizes can add versatility to your embroidery. Smaller hoops can highlight detailed sections or create a centered focal point, while larger hoops accommodate bigger designs or multiple elements. Experimenting with sizes allows you to achieve varied visual effects and improve tension control across different fabric types.
Conclusion
Choosing the right embroidery hoop size tailored to your fabric type and project needs is essential for achieving high-quality results, minimizing errors, and saving both time and money. As the latest market trends indicate, demand for versatile, adjustable, and specialized hoops continues to grow, making it easier than ever to find the perfect fit for your embroidery adventures.
To make the most of your embroidery experience, start by carefully assessing your fabric type and the scope of your project. Investing in adjustable or magnetic hoops can provide added convenience and precision. Don’t forget to test your hooping techniques on scrap fabric before tackling your main project—this simple step can dramatically improve your workflow and final outcome.
We encourage you to share your results and ask questions on embroidery forums or social media groups to refine your skills and discover new tips. Taking these practical steps now will empower you to create beautiful embroidery with confidence and ease. Remember, the right tools and setup choices are your keys to embroidery success—so start implementing these insights today and turn your creative ideas into stunning finished pieces!
Happy stitching, and let your embroidery journey inspire others along the way!
PAXCOO 488Pcs String Bracelet Making Kit, Friendship Bracelet String Kit with 50 Skeins Embroidery Floss Cross Stitch Thread, 400Pcs Friendship Bracelet Beads, 37Pcs Embroidery Tools
$13.99 (as of July 9, 2025 13:07 GMT -04:00 - More infoProduct prices and availability are accurate as of the date/time indicated and are subject to change. Any price and availability information displayed on [relevant Amazon Site(s), as applicable] at the time of purchase will apply to the purchase of this product.)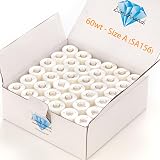
Simthread 144pcs Embroidery Pre-Wound Bobbins Thread, Class 15 Type A Size SA156, Polyester White 60 wt, Bernina Pfaff Ambition BabyLock Brother Embroidery and Sewing Machines Plastic Side
$19.99 (as of July 9, 2025 05:32 GMT -04:00 - More infoProduct prices and availability are accurate as of the date/time indicated and are subject to change. Any price and availability information displayed on [relevant Amazon Site(s), as applicable] at the time of purchase will apply to the purchase of this product.)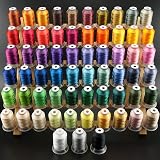
New brothread 63 Brother Colors Polyester Embroidery Machine Thread Kit 500M (550Y) Each Spool for Brother Babylock Janome Singer Pfaff Husqvarna Bernina Embroidery and Sewing Machines
$35.19 (as of July 9, 2025 05:32 GMT -04:00 - More infoProduct prices and availability are accurate as of the date/time indicated and are subject to change. Any price and availability information displayed on [relevant Amazon Site(s), as applicable] at the time of purchase will apply to the purchase of this product.)
New brothread - Single Huge Spool 4000M Each Polyester Embroidery Machine Thread 40WT for Commercial and Domestic Machines - Navy Blue (Janome Color)
$5.94 (as of July 9, 2025 05:32 GMT -04:00 - More infoProduct prices and availability are accurate as of the date/time indicated and are subject to change. Any price and availability information displayed on [relevant Amazon Site(s), as applicable] at the time of purchase will apply to the purchase of this product.)
Premium Rainbow Color Embroidery Floss - Cross Stitch Threads - Friendship Bracelets Floss - Crafts Floss - 14 Skeins Per Pack Embroidery Floss, Light Rust Gradient
$8.99 (as of July 9, 2025 13:07 GMT -04:00 - More infoProduct prices and availability are accurate as of the date/time indicated and are subject to change. Any price and availability information displayed on [relevant Amazon Site(s), as applicable] at the time of purchase will apply to the purchase of this product.)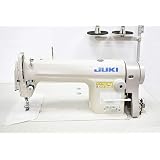
Industrial Sewing Machine Juki DDL-8100 Lockstitch Servo Motor + Table Stand Cut Juki DDL8700 + LED Lamp+ Commercial Grade Sewing Machine
$855.00 (as of July 9, 2025 13:06 GMT -04:00 - More infoProduct prices and availability are accurate as of the date/time indicated and are subject to change. Any price and availability information displayed on [relevant Amazon Site(s), as applicable] at the time of purchase will apply to the purchase of this product.)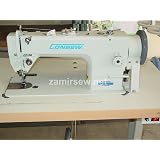
Consew upholstery Walking Foot Industrial Sewing Machine with Table and Servo Motor Drop Feed, Needle Feed, Walking Foot, Lockstitch Machine
$1,549.00 (as of July 9, 2025 13:06 GMT -04:00 - More infoProduct prices and availability are accurate as of the date/time indicated and are subject to change. Any price and availability information displayed on [relevant Amazon Site(s), as applicable] at the time of purchase will apply to the purchase of this product.)
Sewing Kit Basic,Marcoon Needle and Thread Kit with Sewing Supplies and Accessories for Adults,Kids,Beginner,Home,Travel,Emergency Including Scissors,Measure Tape,Needle Threader and More
$5.98 (as of July 9, 2025 11:04 GMT -04:00 - More infoProduct prices and availability are accurate as of the date/time indicated and are subject to change. Any price and availability information displayed on [relevant Amazon Site(s), as applicable] at the time of purchase will apply to the purchase of this product.)
POOLIN EOC06 Embroidery Machine 7.9x11 Inch Large Hoop for Beginners,Computerized 7 Inch Touchscreen,Machine Embroidery Gifts,Includes Hoops,USB,Stabilizer,Bobbins,Home Embroidery Machine
$1,119.99 (as of July 9, 2025 13:07 GMT -04:00 - More infoProduct prices and availability are accurate as of the date/time indicated and are subject to change. Any price and availability information displayed on [relevant Amazon Site(s), as applicable] at the time of purchase will apply to the purchase of this product.)