Embroidery Needle Know-How: Choosing the Right One
Ever felt the frustration of a snapped thread, a skipped stitch, or a needle that just won’t cooperate with your fabric? More often than not, the culprit isn’t your skill, but rather the wrong needle. Choosing the right embroidery needle is paramount for achieving beautiful, professional-looking results. It’s not just about poking a hole in fabric; it’s about precision, compatibility, and respecting the integrity of your materials. Embroidery needles come in a dizzying array of sizes and types, each designed for specific fabrics, threads, and embroidery techniques. Navigating this world can feel overwhelming, but with a little knowledge, you can unlock a smoother, more enjoyable, and ultimately more successful embroidery experience.
This blog post will guide you through the essential considerations when selecting embroidery needles. We’ll explore the different types of needles available, delve into the importance of size and point style, discuss fabric compatibility, and offer tips for maintaining your needles. By the end, you’ll be equipped to confidently choose the perfect needle for every embroidery project, ensuring flawless stitches and stunning results. So, let’s dive in and unlock the secrets to needle selection!
Decoding Embroidery Needle Types
Embroidery needles are not created equal. Each type is designed with specific features to enhance performance with certain threads and fabrics. Understanding these differences is crucial for achieving optimal results. Some of the most common types include crewel needles, tapestry needles, chenille needles, and sharp needles. Each has subtle variations in eye size, point sharpness, and overall construction.
Crewel needles, often referred to as embroidery needles, are a great all-around choice. They typically feature a longer eye to accommodate thicker embroidery threads and a sharp point for piercing tightly woven fabrics. “The size of the eye is important because it needs to be large enough to accommodate the thread you are using without causing it to fray or break,” notes embroidery expert Mary Corbet on her website, Needle ‘n Thread. Tapestry needles, on the other hand, have a blunt point, making them ideal for counted thread techniques like cross-stitch and needlepoint, where you need to pass through existing holes in the fabric without splitting the fibers.
Chenille needles are characterized by their sharp point and large eye, allowing them to easily penetrate heavier fabrics like felt and upholstery. The large eye is also perfect for accommodating thicker threads, such as pearl cotton or floss used for decorative stitching on these materials. Finally, sharp needles are general-purpose needles with a sharp point and a medium-sized eye. They’re suitable for a wide range of embroidery projects on medium-weight fabrics. Choosing the right needle type sets the stage for a successful project, preventing frustration and ensuring beautiful, even stitches.
Consider the specific demands of your project – the fabric, thread type, and desired stitch effect – when selecting the appropriate needle type. This careful consideration will significantly improve your embroidery experience and the quality of your finished work.
Understanding Needle Sizes and Their Importance
Needle sizes in embroidery refer to the diameter of the needle shaft. They’re typically indicated by a numbering system, with smaller numbers representing thicker needles and larger numbers representing finer needles. Choosing the correct size is crucial for preventing damage to your fabric and ensuring smooth thread passage. A needle that is too thick can create large, unsightly holes, while a needle that is too fine might struggle to penetrate the fabric effectively or break easily.
Generally, finer fabrics like silk and linen require finer needles, such as sizes 9 or 10. Medium-weight fabrics like cotton and linen blends can accommodate needles in the size range of 7 or 8. Heavier fabrics like denim and canvas might require thicker needles, such as sizes 5 or 6. It’s also important to consider the thickness of your thread. A thicker thread requires a needle with a larger eye to prevent fraying and breaking. As Nancy Zieman, celebrated sewing expert, explained, “The size of the needle eye must be large enough to allow the thread to pass through easily. If the thread rubs against the eye as you sew, it will fray and break.”
Experimentation is key to finding the perfect needle size for your specific project. Always test your needle and thread combination on a scrap of fabric before starting your main project. Pay attention to how easily the needle passes through the fabric, whether the thread frays, and the overall appearance of your stitches. Adjust the needle size accordingly until you achieve a smooth, even, and aesthetically pleasing result. Remember that the goal is to create a harmonious relationship between the needle, thread, and fabric, allowing them to work together seamlessly to create beautiful embroidery.
Ultimately, selecting the correct needle size is a balancing act. You need a needle that is strong enough to penetrate the fabric without damaging it, and one with an eye large enough to accommodate the thread without causing friction or breakage. By understanding the principles of needle sizing and experimenting with different combinations, you can master this essential aspect of embroidery.
Matching Needle Point Style to Your Fabric
Beyond size, the point style of an embroidery needle plays a significant role in how it interacts with the fabric. Different point styles are designed for specific types of fabrics and embroidery techniques, each offering unique advantages. The most common point styles include sharp, ballpoint, and universal.
Sharp needles, as the name suggests, have a very pointed tip. They are ideal for tightly woven fabrics like cotton, linen, and silk, where you need to precisely pierce the fibers. A sharp point allows the needle to pass through the fabric cleanly, creating crisp, defined stitches. Ballpoint needles, on the other hand, have a slightly rounded tip. They are designed for knit fabrics, where a sharp point could potentially snag or damage the delicate loops of the knit. The rounded tip gently pushes the fibers aside, preventing snags and ensuring smooth stitch formation. “When sewing on knit fabrics, a ballpoint needle is a must,” emphasizes renowned sewing instructor Kenneth D. King. “It allows the needle to slip between the fibers, preventing runs and ladders.”
Universal needles are designed as a compromise between sharp and ballpoint needles. They have a slightly rounded point that is suitable for a wide range of woven and knit fabrics. While they may not be the absolute best choice for any specific fabric, they offer versatility and convenience, especially for projects that involve a mix of materials. The selection of the right point style minimizes fabric damage, promotes even stitch distribution, and enhances the overall appearance of the embroidered design.
Ultimately, considering your fabric is the key to finding the appropriate point style. Sharp for wovens, ballpoint for knits, and potentially universal for a blend, will save you frustration in the long run and improve the quality of your finished embroidery piece. By carefully matching the needle point style to your fabric type, you can ensure a smooth and successful embroidery experience, resulting in beautiful and durable projects.
Embroidery Needle Materials: Steel vs. Titanium
The material composition of an embroidery needle significantly impacts its durability, smoothness, and overall performance. The two primary materials used in embroidery needle manufacturing are steel and titanium. While both have their advantages, titanium needles offer enhanced durability and resistance to corrosion, making them a worthwhile investment for serious embroiderers.
Steel needles are the most common and affordable option. They are typically made from high-carbon steel, which is then hardened and tempered to improve its strength and flexibility. Steel needles are suitable for a wide range of embroidery projects and offer good performance on various fabrics. However, they are susceptible to bending and breaking, especially when used on heavier fabrics or with thicker threads. Additionally, steel needles can corrode over time, particularly in humid environments, which can affect their smoothness and lead to snagging.
Titanium needles, on the other hand, are made from a titanium alloy, which is significantly stronger and more durable than steel. Titanium needles are less likely to bend or break, even when used on tough materials. They are also highly resistant to corrosion, ensuring long-lasting performance and smoothness. As stated on Schmetz Needles’ website, “Titanium needles have a longer life due to the hardness of the material.” This makes them a great choice for frequent embroiderers.
While titanium needles are more expensive than steel needles, their superior durability and resistance to corrosion can make them a cost-effective option in the long run. Consider the frequency of your embroidery projects and the types of fabrics you typically work with when deciding between steel and titanium needles. If you frequently embroider on heavy fabrics or use thicker threads, investing in titanium needles can save you money and frustration in the long run. For occasional projects on lighter fabrics, steel needles may be sufficient. Regardless of the material, remember to regularly inspect your needles for signs of wear and tear and replace them as needed to maintain optimal performance.
Thread and Needle Compatibility: A Crucial Partnership
The relationship between your embroidery thread and needle is paramount to achieving flawless stitches. Incompatible pairings lead to thread breakage, skipped stitches, and overall frustration. Understanding this partnership is the key to a smoother embroidery journey. The diameter of the needle eye must be large enough to accommodate the thread without causing excessive friction or fraying. A thread that is too thick for the needle eye will constantly rub against the edges, weakening the fibers and eventually causing it to break. Conversely, a thread that is too thin for the needle eye may slip and slide, resulting in loose or uneven stitches.
Experimentation is key. Always test your chosen thread and needle combination on a scrap of your project fabric before starting the main embroidery. Observe how easily the thread passes through the needle eye and whether it frays or snags. Pay attention to the tension of the stitches and whether they appear even and secure. Adjust the needle size or thread thickness as needed until you achieve a harmonious balance. “It’s all about finding the sweet spot where the thread glides smoothly through the fabric, creating beautiful, well-defined stitches,” explains Lisa Lam, author of “A Field Guide to Fabric Design.”
Consult thread manufacturer recommendations for suggested needle sizes. Many thread brands provide guidelines on their packaging or websites, indicating the ideal needle size range for their specific thread types. However, these recommendations are just a starting point. Always test your combination and adjust as needed based on your individual project and fabric type. Consider both the thread weight and the thread material. Thicker threads, such as pearl cotton or floss, require needles with larger eyes than finer threads, such as silk or metallic threads. Certain thread materials, such as metallic threads, are more prone to fraying and require special needles with larger, smoother eyes to minimize friction.
Maintaining Your Embroidery Needles for Longevity
Proper care and maintenance of your embroidery needles are essential for preserving their sharpness, preventing rust, and ensuring optimal performance. With a little attention, you can extend the lifespan of your needles and avoid the frustration of working with dull or damaged tools. Regular inspection, cleaning, and proper storage are the cornerstones of needle maintenance.
Inspect your needles regularly for signs of wear and tear. Look for bent tips, burrs, or rust. A bent tip can snag the fabric, causing uneven stitches, while burrs can fray the thread. Rust can roughen the surface of the needle, making it difficult to pass through the fabric smoothly. Discard any needles that show signs of damage, as they can compromise the quality of your embroidery and potentially damage your fabric. Cleaning your needles after each use will remove any lint, thread residue, or oils that may have accumulated during the embroidery process. Use a soft cloth or needle cleaner to gently wipe the needle, paying particular attention to the eye. For stubborn residue, you can use a small amount of rubbing alcohol or a commercial needle cleaner.
Store your needles properly to protect them from dust, moisture, and physical damage. A needle case or organizer is ideal for keeping your needles separated and preventing them from rubbing against each other. You can also store your needles in a pincushion filled with emery, a slightly abrasive material that helps to keep the needle sharp and free of rust. According to sewing supply manufacturer Dritz, “An emery pincushion will help sharpen and clean your needles as you use it.” In humid environments, consider storing your needles with a desiccant pack to absorb excess moisture and prevent rust.
By incorporating these simple maintenance practices into your embroidery routine, you can keep your needles in top condition, ensuring smooth, consistent, and enjoyable stitching for years to come. Properly maintained needles not only improve the quality of your embroidery but also save you money in the long run by extending the lifespan of your tools.
When to Replace Your Embroidery Needle
Knowing when to replace your embroidery needle is just as important as choosing the right one in the first place. Even with the best care, needles eventually wear out and lose their sharpness, affecting the quality of your stitches and potentially damaging your fabric. Recognizing the signs of a worn-out needle is crucial for maintaining optimal embroidery results. There are several key indicators that it’s time for a replacement.
The most obvious sign is a bent or broken needle. If your needle is visibly damaged, it’s an immediate red flag. Using a bent needle can snag the fabric, cause uneven stitches, and even damage your embroidery machine. Similarly, a broken needle is a safety hazard and should be discarded immediately. Another sign of a worn-out needle is a dull point. A sharp needle should effortlessly pierce the fabric with minimal resistance. If you find yourself having to force the needle through the fabric or if it’s leaving behind large, unsightly holes, the point is likely dull. As noted on the Janome website, “A dull needle can cause skipped stitches, thread breakage, and fabric damage.”
Pay attention to the sound of your machine. A worn-out needle can cause the machine to sound louder or more strained than usual. Listen for unusual clicking or grinding noises, which can indicate that the needle is struggling to pass through the fabric. Finally, consider the frequency of your embroidery projects. Even if your needle doesn’t show any obvious signs of wear and tear, it’s a good idea to replace it periodically, especially if you embroider frequently. A general rule of thumb is to replace your needle after every 8 hours of use, or after completing a particularly large or complex project. By proactively replacing your needles, you can ensure consistent stitch quality and prevent potential damage to your fabric and machine.
In conclusion, investing in quality needles and knowing when to replace them is an investment in the success of your embroidery projects. Don’t wait until your needle is visibly damaged to replace it. Be proactive and replace it regularly to maintain optimal performance and protect your precious fabrics.
Key Takeaways and Final Thoughts
Choosing the best embroidery needles is a multifaceted process, but with the right knowledge, you can make informed decisions that elevate your embroidery work. From understanding the different types of needles to recognizing the importance of size, point style, material, and thread compatibility, each element plays a crucial role in achieving optimal results. Remember that no single needle is perfect for every project. Experimentation and adaptation are key to finding the ideal combination for your specific fabric, thread, and desired stitch effect.
Consider the material of the needle, remembering titanium offers enhanced durability for frequent embroiderers, and pay attention to maintaining your needles through regular cleaning and proper storage. Knowing when to replace a worn-out needle will help you keep your stitches clean and beautiful, and it will also protect your fabrics and embroidery machine from damage. By implementing these guidelines, you’ll avoid common frustrations like thread breakage and skipped stitches, and your projects will come to fruition more smoothly.
Ultimately, the goal is to create a harmonious relationship between your needle, thread, and fabric, allowing them to work together seamlessly to bring your creative vision to life. So, embrace the journey of discovery, experiment with different combinations, and don’t be afraid to make mistakes. With patience and practice, you’ll develop a keen sense for what works best for you, unlocking a world of possibilities in the art of embroidery. Happy stitching!
PAXCOO 488Pcs String Bracelet Making Kit, Friendship Bracelet String Kit with 50 Skeins Embroidery Floss Cross Stitch Thread, 400Pcs Friendship Bracelet Beads, 37Pcs Embroidery Tools
$13.99 (as of June 22, 2025 13:06 GMT -04:00 - More infoProduct prices and availability are accurate as of the date/time indicated and are subject to change. Any price and availability information displayed on [relevant Amazon Site(s), as applicable] at the time of purchase will apply to the purchase of this product.)
New brothread Set of 2 White Bobbin Thread/Bottom Thread 60WT Huge Spool 5000M (5500Y) for Embroidery and Sewing Machines
$14.99 (as of June 23, 2025 05:32 GMT -04:00 - More infoProduct prices and availability are accurate as of the date/time indicated and are subject to change. Any price and availability information displayed on [relevant Amazon Site(s), as applicable] at the time of purchase will apply to the purchase of this product.)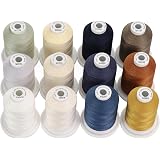
New brothread - 18 Options - Multi-Purpose 100% Mercerized Cotton Threads 50S/3 600M(660Y) Each Spool for Quilting, Serger, Sewing and Embroidery - 12 Neutral&Jean Colors
$22.99 (as of June 23, 2025 07:58 GMT -04:00 - More infoProduct prices and availability are accurate as of the date/time indicated and are subject to change. Any price and availability information displayed on [relevant Amazon Site(s), as applicable] at the time of purchase will apply to the purchase of this product.)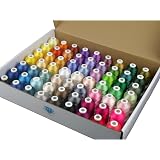
Simthread 63 Brother Colors Polyester Embroidery Machine Thread Kit 40 Weight for Brother Babylock Janome Singer Pfaff Husqvarna Bernina Embroidery and Sewing Machines 550Y
$46.99 (as of June 22, 2025 13:06 GMT -04:00 - More infoProduct prices and availability are accurate as of the date/time indicated and are subject to change. Any price and availability information displayed on [relevant Amazon Site(s), as applicable] at the time of purchase will apply to the purchase of this product.)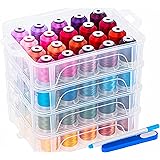
New brothread 80 Spools 500m Each Embroidery Machine Thread with Clear Plastic Storage Box - Colors Compatible with Janome and Robison-Anton Colors
$47.59 (as of June 23, 2025 05:32 GMT -04:00 - More infoProduct prices and availability are accurate as of the date/time indicated and are subject to change. Any price and availability information displayed on [relevant Amazon Site(s), as applicable] at the time of purchase will apply to the purchase of this product.)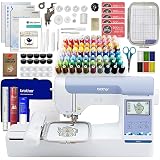
Brother PE900 5" x 7" Embroidery Machine with Deluxe Embroidery & Digitizing Software Bundle
(as of June 23, 2025 13:06 GMT -04:00 - More infoProduct prices and availability are accurate as of the date/time indicated and are subject to change. Any price and availability information displayed on [relevant Amazon Site(s), as applicable] at the time of purchase will apply to the purchase of this product.)
Brother PE545 Embroidery Machine, Wireless LAN Connected, 135 Built-in Designs, 4" x 4" Hoop Area, Large 3.7" LCD Touchscreen, USB Port, 10 Font Styles
$459.99 (as of June 23, 2025 13:06 GMT -04:00 - More infoProduct prices and availability are accurate as of the date/time indicated and are subject to change. Any price and availability information displayed on [relevant Amazon Site(s), as applicable] at the time of purchase will apply to the purchase of this product.)
POOLIN EOC06 Embroidery Machine 7.9x11 Inch Large Hoop for Beginners,Computerized 7 Inch Touchscreen,Machine Embroidery Gifts,Includes Hoops,USB,Stabilizer,Bobbins,Home Embroidery Machine
$1,399.99 (as of June 23, 2025 13:06 GMT -04:00 - More infoProduct prices and availability are accurate as of the date/time indicated and are subject to change. Any price and availability information displayed on [relevant Amazon Site(s), as applicable] at the time of purchase will apply to the purchase of this product.)
anezus Self Healing Sewing Mat, 12inch x 18inch Rotary Cutting Mat Double Sided 5-Ply Craft Cutting Board for Sewing Crafts Hobby Fabric Precision Scrapbooking Project
$8.99 (as of June 23, 2025 11:03 GMT -04:00 - More infoProduct prices and availability are accurate as of the date/time indicated and are subject to change. Any price and availability information displayed on [relevant Amazon Site(s), as applicable] at the time of purchase will apply to the purchase of this product.)